웹에서 FCM 보내기
node.js 환경에서 FCM 보내기를 하려고 합니다. FCM은 HTTPv1(버전)으로 기준으로 작성하였습니다.
웹 푸시는 운영하는 페이지에는 접속은 안해도 되지만 브라우저는 실행시켜야지 푸시메세지를 송신할 수 있습니다.
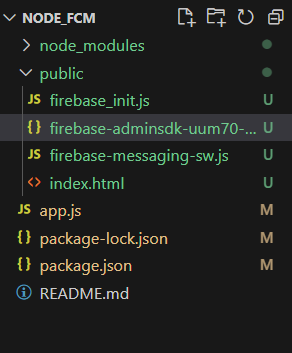
폴더 구조는 아래의 사진처럼 했습니다.
1. server 단 코드 app.js
1
2
3
4
5
6
7
8
9
10
11
12
13
14
15
16
17
18
19
20
21
22
23
24
25
26
27
28
29
30
31
32
33
34
35
36
37
38
39
40
41
42
43
44
45
46
47
48
49
50
51
52
53
54
55
56
57
58
59
60
61
62
63
64
65
66
67
68
69
70
71
72
73
74
75
76
77
78
79
80
81
82
83
84
85
86
const express = require('express');
const path = require('path');
const { JWT } = require('google-auth-library');
const fs = require('fs').promises;
var bodyParser = require("body-parser");
const axios = require('axios');

const app = express();
const PORT = 3000;

app.use(bodyParser.json());
app.use(express.json());
app.use(express.urlencoded({ extended: false }));
app.use(express.static(path.join(__dirname, 'public')));

// Firebase Access Token 가져오기 함수
const firebaseMessagingScope = 'https://www.googleapis.com/auth/firebase.messaging';

async function getAccessToken() {
  try {
    const json = await fs.readFile('public/<project>-firebase-adminsdk-uum70-4ab63d0963.json', 'utf8');
    // access token을 가져오기 위해 json 파일 읽는 부분
    const credentials = JSON.parse(json);

    const client = new JWT(
      credentials.client_email,
      null,
      credentials.private_key,
      [firebaseMessagingScope]
    );

    await client.authorize();
    const accessToken = client.credentials.access_token;
    return accessToken;
  } catch (error) {
    console.error('Error getting access token:', error);
    throw error;
  }
}

// 루트 경로
app.get('/', (req, res) => {
  res.sendFile(path.join(__dirname, 'public', 'index.html'));
});


// 푸시 알림 보내기 라우트
app.post('/send-notification', async (req, res) => {
  const token = req.body.token;
  const title = req.body.title;
  const content = req.body.content;

  const access_token = await getAccessToken(); // 위에서 선언한 access token 가져오는 함수 실행

  try {
    const response = await axios.post('https://fcm.googleapis.com/v1/projects/<your_porject_id>/messages:send', {
      //http v1 부터 위의 url처럼 사용합니다.
      message: {
        token: token,
        notification: {
          title: title,
          body: content,
        },
      },
    }, {
      headers: {
        'Content-Type': 'application/json; charset=UTF-8',
        'Authorization': 'Bearer ' + access_token,
      }
    });
    if (response.status === 200) {
      res.send('푸시 메시지가 성공적으로 전송되었습니다.');
    } else {
      res.status(500).send('푸시 메시지 전송 실패: ' + response.statusText);
    }
  } catch (e) {
    console.error('sendPushNotification error:', e.toString());
  }
});


// 서버 시작
app.listen(PORT, () => {
  console.log(`서버실행 http://localhost:${PORT}`);
});
access token을 발급받기 위해 ‘google-auth-library’ 패키지를 설치해서 사용합니다.
2. 웹 페이지 index.html
<!DOCTYPE html>
<html lang="en">
<head>
    <meta charset="UTF-8">
    <meta name="viewport" content="width=device-width, initial-scale=1.0">
    <title>Firebase Cloud Messaging Example</title>
     <!-- Firebase JavaScript SDK -->
     <script src="https://www.gstatic.com/firebasejs/8.6.1/firebase-app.js"></script>
     <script src="https://www.gstatic.com/firebasejs/8.6.1/firebase-messaging.js"></script>

     <!-- Firebase 초기화 및 서비스 워커 등록 -->
     <script src="firebase_init.js"></script>

     <!-- jquery -->
     <script src="https://ajax.googleapis.com/ajax/libs/jquery/3.5.1/jquery.min.js"></script>
</head>
<body>
    <h1>Push Notification</h1>
    <textarea id="token-input" placeholder="Enter token"></textarea>
    <br><br>
    <input type="text" id="title-input" placeholder="Enter title">
    <br><br>
    <textarea id="content-input" placeholder="Enter content"></textarea>
    <br><br>
    <button id="send-button">Send Push Notification</button>
    <script>
        $(document).ready(function () {
            $('#send-button').click(function () {
                const token = $('#token-input').val();
                const title = $('#title-input').val();
                const content = $('#content-input').val();
                // input, textarea 에 입력된 value 를 /send-notification'
                $.ajax({
                    url: '/send-notification',
                    type: 'POST',
                    data: {
                        token: token,
                        title: title,
                        content: content
                    },
                    success: function (response) {
                        console.log('Push notification sent successfully');
                    },
                    error: function (error) {
                        console.error('Failed to send push notification:', error);
                    }
                });
            });
        });
    </script>
</body>
</html>
이 html파일이 public 안에 있는 이유는 app.js 애서 res.sendFile로 파일을 전달하고 view 폴더를 app.js에서 따로 지정을 안했기 때문입니다.
3. 웹 페이지 index.html에 있는 firebase_init.js
1
2
3
4
5
6
7
8
9
10
11
12
13
14
15
16
17
18
19
20
21
22
23
24
25
26
27
28
29
30
31
32
33
34
35
36
37
38
39
40
41
42
43
44
45
46
47
48
49
50
51
52
53
54
55
56
57
58
59
60
61
62
63
64
65
66
67
68
69
70
71
// Firebase 설정
    const firebaseConfig = {
    apiKey: "-.....-9RtY",
    authDomain: "<your_project_id>.firebaseapp.com",
    projectId: "<your_project_id>",
    storageBucket: "<your_project_id>.appspot.com",
    messagingSenderId: "........",
    appId: ".................",
    measurementId: "G-....."
  };

// Firebase 초기화
firebase.initializeApp(firebaseConfig);

// VAPID 키 설정 (Firebase Cloud Messaging을 위해 필요)
const vapidKey = '.....-Wgu.....';

// Firebase Messaging 인스턴스 가져오기
const messaging = firebase.messaging();

// 서비스 워커 등록 및 처리
if ('serviceWorker' in navigator) {
  navigator.serviceWorker.register('/firebase-messaging-sw.js', {
    scope: '/firebase-cloud-messaging-push-scope'
  }).then((registration) => {

    // FCM 메시지 수신 핸들러 등록
    messaging.onMessage((payload) => {

      // 알림 커스터마이징 가능
      const notificationTitle = payload.notification.title;
      const notificationOptions = {
        body: payload.notification.body,
      };

      registration.showNotification(notificationTitle, notificationOptions);
    });
  }).catch((err) => {
    console.error('Service Worker registration failed:', err);
  });
}

// 사용자에게 알림 허용 여부 묻기
function requestPermission() {
  Notification.requestPermission().then((permission) => {
    if (permission === "granted") {
      // 알림 권한 허용 시 추가 작업 수행 가능
      getFCMToken();
    }
  });
}

// FCM 토큰 받기
function getFCMToken() {
  messaging.getToken({ vapidKey: vapidKey }).then((currentToken) => {
    if (currentToken) {
      console.log("FCM Token:", currentToken);
      // 토큰을 서버로 전송하고 UI 업데이트 등 추가 작업 수행 가능

      // 직접 #token-input textarea에 값 넣는 부분
      document.getElementById('token-input').value = currentToken
    } else {
      console.log("No registration token available. Request permission to generate one.");
    }
  }).catch((err) => {
    console.log("An error occurred while retrieving token. ", err);
  });
}

// 초기화 후 알림 권한 요청
requestPermission();
getFCMToken() 함수에 있는 document.getElementById(‘token-input’).value = currentToken 부분이 index.html에 있는 id=”token-input”인 textarea에 값을 넣는 부분입니다.
그리고 service worker라는 것이 있는데 해당 웹 페이지에 접속을 안해도 푸시메시지를 송신하기 위해 꼭 필요한 작업입니다. 웹 페이지에 등록이 되어야 가능합니다.
firebase에서 fcm 보낼 때는 firebase-messaging-sw.js라는 파일 명의 service worker 파일이 있어야 합니다. 해당 파일은 node.js 환경에서 작업을 하기 때문에 public 폴더 안에 위치시켜야 합니다.
4. firebase-messaging-sw.js 파일 내용
1
2
3
4
5
6
7
8
9
10
11
12
13
14
15
16
17
18
19
20
21
22
23
24
25
26
27
28
29
30
31
32
33
  importScripts('https://www.gstatic.com/firebasejs/9.15.0/firebase-app-compat.js');
  importScripts('https://www.gstatic.com/firebasejs/9.15.0/firebase-messaging-compat.js');

  // Firebase 설정
    const firebaseConfig = {
      apiKey: "-.....-9RtY",
      authDomain: "<your_project_id>.firebaseapp.com",
      projectId: "<your_project_id>",
      storageBucket: "<your_project_id>.appspot.com",
      messagingSenderId: "........",
      appId: ".................",
      measurementId: "G-....."
    };

  // Firebase 초기화
  firebase.initializeApp(firebaseConfig);

  // Firebase Messaging 인스턴스 가져오기
  const messaging = firebase.messaging();

  // 백그라운드 메시지 핸들러 설정
  messaging.onBackgroundMessage(function(payload) {
    console.log('[firebase-messaging-sw.js] Received background message ', payload);

    // 알림 커스터마이징 가능
    const notificationTitle = payload.notification.title;
    const notificationOptions = {
      body: payload.notification.body,
    };

    self.registration.showNotification(notificationTitle, notificationOptions);
  });
5. firebase-adminsdk-uum70-4ab63d0963.json 대략적인 파일 내용
1
2
3
4
5
6
7
8
9
10
11
12
13
{
  "type": ".....",
  "project_id": "<your_project_id>",
  "private_key_id": ".............",
  "private_key": "-----BEGIN PRIVATE KEY----lUiRok/.....",
  "client_email": "firebase-admin......0@<your_project_id>.iam.....com",
  "client_id": ".......",
  "auth_uri": "https://a..................",
  "token_uri": "https://...............n",
  "auth_provider_x509_cert_url": "........",
  "client_x509_cert_url": "https://www......%<your_project_id>.iam......com",
  "universe_domain": "googleapis.com"
}
firebase-adminsdk-uum70-4ab63d0963.json은 firebase에서 프로젝트 설정에서 확인할 수 있습니다.
6. 패키지 정보
1
2
3
4
5
6
7
8
9
10
11
12
13
14
15
16
17
18
19
20
21
22
{
  "name": "node_fcm",
  "version": "1.0.0",
  "description": "",
  "main": "app.js",
  "scripts": {
    "start": "node app.js",
    "test": "echo \"Error: no test specified\" && exit 1"
  },
  "author": "",
  "license": "ISC",
  "dependencies": {
    "@onesignal/node-onesignal": "^2.0.1-beta1",
    "axios": "^1.7.2",
    "body-parser": "^1.20.2",
    "ejs": "^3.1.10",
    "express": "^4.18.2",
    "google-auth-library": "^9.11.0",
    "path": "^0.12.7"
  }
}
🧐 오늘의 소감은?
처음으로 웹 푸시를 해보는 데 너무 구글이나 깃허브 같으느 로그인을 해서 토큰을 얻어오는 것이 아닌 로그인 없이 해당 사이트를 접속했을때 토큰을 가져오는 방법이 생소했었습니다.
다른 예제들은 firebase-admin 패키지를 사용해서 토큰을 가져오더라고요 ㅠㅠㅠ 어떻게 접근해야하는 지 처음 감이 너무 안잡혔어서 3일 밤 꼬박 새서 겨우 해결했던 것 같습니다.. 이건 진짜 너무 어려웠어요 그래도 다음 프로젝트를 할 때 좀 더 쉽게 접근 할 수 있겠죠?? 휴휴 그나마 그 생각이 제가 일하면서 힘이 됩니다.